Box Card Ice Cream Cherry Tutorial

Happy Thursday! I scream, you scream, we all scream for ice cream! It’s been so hot here in South Dakota that I needed a little ice cream to cool off. Today I’m going to walk you though how to create this cute little ice cream box card. You can find it here SVG or here Silhouette .

Before I started, I changed the sentiment phrase “You’re the cherry on top” to be written in pen rather than cut out. Then I cut all my pieces.

I inked some of my pices because I like the look it gives. Just an extra little pop. This is not necessary but does give a finished look to the card.
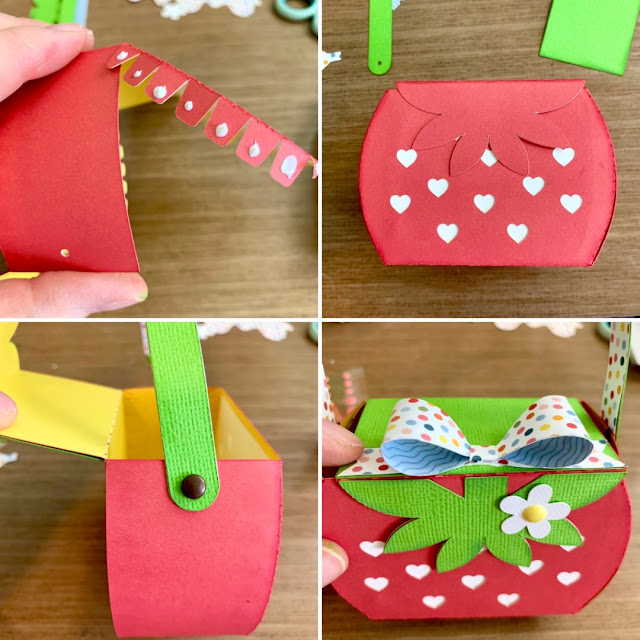
Time to start assembling the box. I love using score tape for thing like this. The hold is good and rarely comes apart like some glue. I added the score tape to the tab and created the box.
The next step is this little off white piece. Again, Score Tape on the flaps and center it in the box with the tabs just below the top of the box.
I then started to assemble to ice cream. I found that the Zig glue pen worked best with that little lattice for the cone. 
I added the ice cream scoop with the dip it in first. Then I added this cute sprinkle paper for the top layer.
Next I assembled this scoop of ice cream. I just layered the cherry over the stem piece and the stem piece over the matching spot on the scoop.
Add your sentiment piece to the cone piece without the notch.
 
Next I added Score Tape to both sides of my box.


Add the single scoop with the cherry to the center piece using Score Tape. And you have this cute little ice cream box card.

And it lays flat for mailing. I can’t wait to make someone’s day by sending this to them.

Happy Crafting!
Chelsea

5×7 Card Happy Birthday Words Tutorial

Happy Thursday! Teri here. I’ve been a member of Lori’s team for several years now but I work mostly behind the scenes. Today I’m going to show you how to put the 5×7 Card Happy Birthday Words card together. You can find it here: SVG, Silhouette.

I love this card! It’s so versatile. You can use masculine, feminine, patterned papers or even one color. It’s an amazing card! Let’s get started.

First, I cut out all my pieces.

On the reverse side of the card front and using a thin glue bottle tip, apply glue to the very edges of the first H and the marks.

This is what it should look like.

Next, apply glue to the edges of the A and the marks above it.

Then apply glue to the edges of the other letters. There should be enough room for each letter so that none of the colors should not overlap.
After all the letters have been glued in place, apply glue to the edges and in a couple of spots in the center of the card. Then apply it to your card base.
There you have it! All done and super cute!
Enjoy your day!
Teri

Shadow Box Bee Card Tutorial

Hello friends! Traci here and today I have the cutest little card to share with you that’s perfect for summer. I made it using one of Lori’s awesome cutting files called Shadow Box Bee Card (SVG, Silhouette) and I’m so in love with all the pretty layers!

Shadowbox Bee Card made with a Lori Whitlock cutting file


I’ve had so much fun creating with Lori’s Bee Happy Collection that she designed for Echo Park. So, I chose the honeycomb print from it called Life is Sweet for the front and the solid green for the leaves and stems. The colors were perfect. 

Here’s a quick tutorial on how I put the card together …

Cut out all of the white pieces first so that you can see how
the colored pieces are going to be adhered.

Shadowbox Bee Card Tutorial by Artsy Albums

Add your colored patterned paper to the white cardstock pieces before gluing the 2 card bases together. 

Then adhere one of the base tabs to the back of the other base as shown above. The other tab (on the right side in the photo above) will be what you use later to secure the front with.

Shadowbox Bee Card Tutorial by Artsy Albums


Adhere all of the fun colored pieces to the 3 inside white scenes.  

Shadowbox Bee Card Tutorial by Artsy Albums


Then add the scenes inside the shadowbox base. Start with the blue flowers first, inserting the tabs into the slots on the sides.

Shadowbox Bee Card Tutorial by Artsy Albums

Repeat this for the bee scene, then continue with the last one that has the red flowers.

Shadowbox Bee Card Tutorial by Artsy Albums


Once they are securely in place, you can close the front of the card and adhere it to the tab on the left.

Shadowbox Bee Card Tutorial by Artsy Albums using a Lori Whitlock cutting file


And voila!! You’ve got an un-bee-lievably cute card to send to someone special. When it’s open, it can stand alone on a shelf, desk, or counter for display.

Shadowbox Bee Card Tutorial by Artsy Albums

But when it’s being sent through the mail or stored, it can be folded flat. I hope you have fun with this one! Thanks for stopping by the blog and have a great day!


Blog * Shop * Facebook * Instagram * Pinterest

Graduation Tassel Tutorial

It’s graduation season and you may need a tassel for one of Lori’s many great graduation cards. The card that I’m making a tassel for is Lori’s 5×7 Gate Fold Graduation Card (SVG, Silhouette). Here is how I make them. I start with a yellow-gold color. Of course, you can choose your own color that will coordinate with your graduate’s school colors.

I then cut TWO 6-inch pieces. These pieces will be used to attach the tassel to the card and to assure that the tassel stays together. Set those aside.
Next, I start to wrap the thread through my fingers so that I can hold the end piece securely. This is also when I decide the appropriate length of my tassel for my project. For this project, the tassel is about 4 inches long. make sure to add about half an inch as you will trim the ends to even them up.
Then I wrap the thread around my fingers until I feel like I have enough thread to make a good tassel for my project. For this card, I did about 15 wraps.
Then I tie one of those 6-inch pieces at the top, doubling the thread so that I have 2 3-inch pieces after knotting the the thread. This will be the piece that gets threaded through the card’s hat top.

Then I will add the second 6-inch thread to wrap the threads together. I will tie this in a secure knot. If I feel like the thread isn’t feeling too secure I will put a small dot of super glue on the knot to help secure it.

Then I will cut the bottom thread pieces as well as the tied and knotted threads to evenly trim them up.

To help thread the tassel through the cap, I use some of my favorite liquid glue and add a small dot of glue to the ends and then twist the threads together. Set this aside to dry for a few minutes to make a “needle”.

When the glue is dry, go ahead and thread it through the hole in the cap, knotting the thread on the underside of the cap. I will usually knot it a couple of times to make a big enough knot so that it doesn’t slip through the hole.

This is how the card looks when finished. I love it! Lori makes the best designs. She puts great thought into her products.

Enjoy!
Teri

Strawberry Purse and Jam Jar Card

Good Moring friends! Today I am sharing an assembly tutorial for some of the new strawberry projects that were posted this week. I made the Strawberry Purse (SVG, Silhouette) and the A2 Strawberry Jam Jar Card (SVG, Silhouette). For this project, I also cut out a 3D Bow for the top of my purse. I used the bow from the Gable Box with Bow (SVGSilhouette).

Once all of my pieces were cut, I folded all of the tabs in a mountain fold. Then inked all the edges with a corresponding color to help cover the white core paper and add dimension to each piece.

Before gluing the sides together, I glued the white panel piece inside the purse to cover the heart holes. This would also be cute left open. I then folded the lid back out of the way and added glue to all the tab on one side of the purse. (I find less glue is best when using a wet glue.)  I started with the back of the purse. I pinched the first tab on the top to the flat edge to secure then moved along the side pinching each tab to ensure it was secured.

Then repeated for each side. Now with the edges all glued, I added the green leaves and lid. (Sorry I missed a picture.) I cut two handles one green and one with a pattern paper that matched my bow. I put the green one on the outside and pattern paper on the inside. I did glue the two handles together and added the handle to the purse with brads. I assembled the bow and glued it to the top of the purse. I also added the flower to the front of the purse. I used an enamel dot for the center of my flower.
The jam jar card is really quick and so cute. I inked the edges of all the colored pieces and around the outside edge of the tag. The strawberries are in three pieces. I added tiny amounts of glue to the back of the red pieces then attached the white pieces to the red. Then glued the green leaves into place. The small strawberry is for the tag and the large one is for the scalloped label. The paper ribbon slides through the tag hole and then glued to the dotted cover of the jar. I then glued the scalloped label to the middle of the jam jar.
I embellished the purse with a few stickers from the Here Comes the Sun sticker book. All of the papers and stickers came from the Here Comes the Sun collection by Echo Park Paper.

This little gift set is so sweet! It will be perfect for a mom, teacher, grandma, sister, or friend! Thanks for stopping by today and I hope you enjoy the rest of your week!

Brandie