3D Pumpkin Tutorial

I wish I could say fall is in the air… not quite yet in New England… so I’m making my own “fall” today!  This adorable 3D Pumpkin (SVG, Silhouette) was the perfect little project to make me feel more autumn-like!  It’s such a cute little decoration, you could fill it with a treat or use it as part of your seasonal tiered tray décor!  Take a peek…

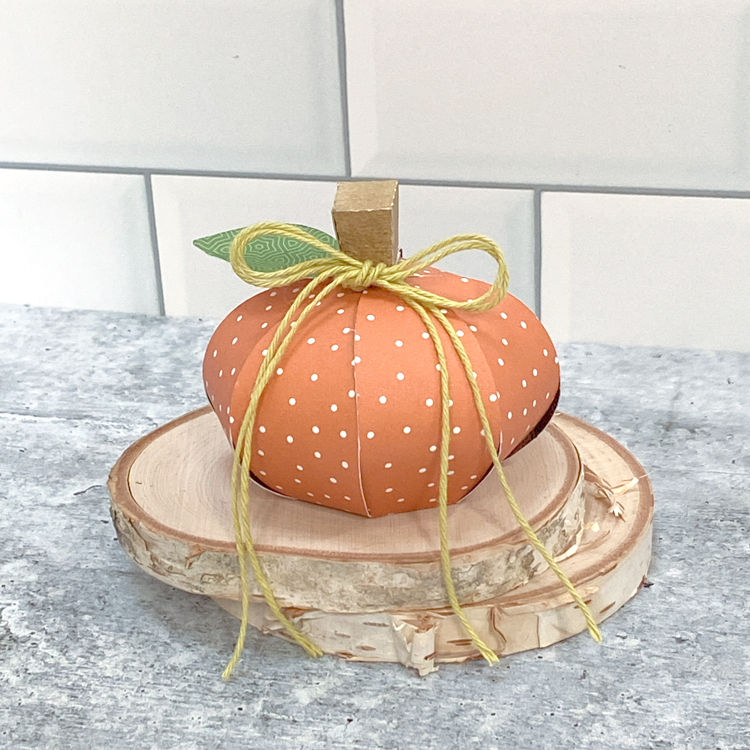
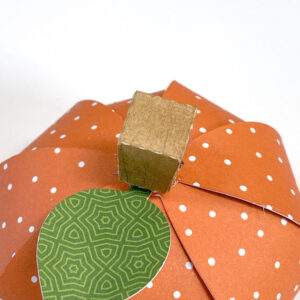
I put together a quick assembly tutorial for this file… it’s really pretty simple….  I started by cutting my pieces. I curled the pumpkin sides using a pencil.  I also went to my stash to find a brad.  It really does not matter what color brad, it gets covered up. A smaller brad would be best.   Next, I folded the score lines of the stem piece all in the same direction. I maneuvered the pieces to create the stem shape and glued it together.

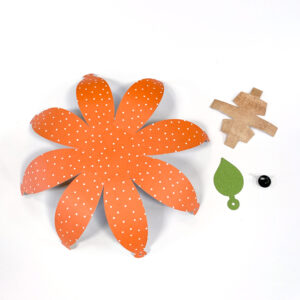
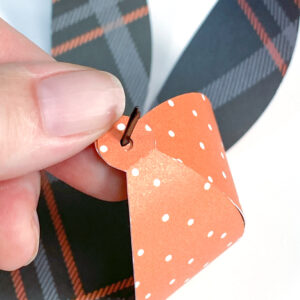
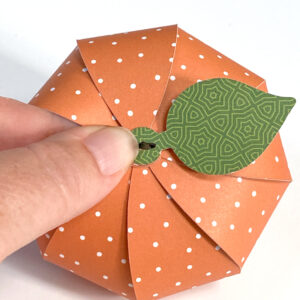
Next I gathered up the pumpkin sides to form the round pumpkin shape.  I chose to place my brad on the inside and have the prongs on the outside.  I found that easier.  You could always do it the other way.  I started bringing up each side, and sliding it over the brad tongs to keep it in place.

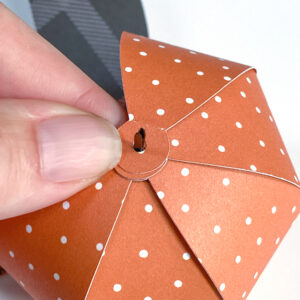
When I got to the last few sides, I gently stuck my hand into the pumpkin between 2 of the sides and then folded over the last piece.  If you are going to add a small treat to your pumpkin you will want to add it before you bring over the last side.

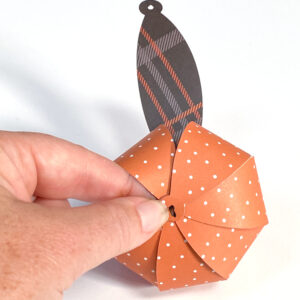
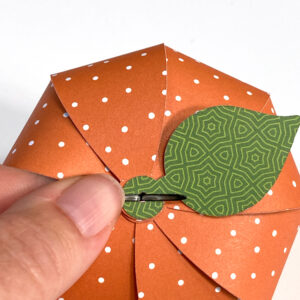
Once I had the last side in place, I then added the leaf.  I folded out the prongs of the brad to hold it all in place.  I then glued the stem on top of the brad to cover.  I did have to snip the ends of my brad, but if you used a smaller brad you might not have to.  I only had a large one.

All that was left was to add some fun twine!

That’s it for me today, thanks for stopping by to peek!

BLOG | INSTAGRAM

Easter Bunny Head Shaped Box

I’m hopping into Easter with this adorable new Easter Bunny Head Shaped Box (SVG, Silhouette) !  It’s so cute, and easy to assemble… it’s perfect to hold some sweet treats for your favorite bunnies!!  Take a peek…

I decided to add a little bow to my bunny using this 3D Bow (SVG, Silhouette) which I sized down slightly to fit the ear.  Below, is a quick guide to assembling this box.

When you open the file, the sides of the box top and box bottom are shown in the order they are attached.  Simply glue them together to form one long strip.  Both the top and bottom are assembled in the same manner. They each have 2 bunny head shapes.  One is slightly smaller.   For the top, starting where indicated (X), wrap the sides of the box around the smaller bunny head, gluing the tabs as you go. (tabs go on the outside of the bunny head shape)  Flip the completed piece over, and add the second, slightly larger bunny (be sure to add the black behind the eyes and nose first)  head to the cover, covering the tabs.  Repeat the same process with the bottom.

If you create any of these cute boxes, be sure to tag @loriwhitlock on Facebook and Instagram!  That’s it for me today, thanks for stopping by to peek.

BLOG | INSTAGRAM

New Spring/Easter Projects Bundle 2

Just in time for Easter, I have a fun new Spring Easter Project Bundle 2! There are 5 new projects… some cards and an adorable Bunny Box!  Take a peek…

Hexagon Pop Up Card Bunny Carrots   (SVG, Silhouette) – Tutorial

Slimline Easter Bunny Card  (SVG, Silhouette)

A2 Easter Chick Bunny Row Card  (SVG, Silhouette)

Slimline Vertical Easter Chick Card  (SVG, Silhouette)

Easter Bunny Head Shaped Box  (SVG, Silhouette)

There’s still time to get your Easter cards and projects done, so head over to the Lori Whitlock SVG Shop or my gallery in Silhouette today!

Have a great day!


Bunny Head Box Tutorial

Anita here with a tutorial to make Lori’s Bunny Head Box (SVG, Silhouette).  I used some of Lori’s Echo Park Paper collections for this box including Wish Upon a Star and Celebrate Spring.  I am going to make these to give to each person who comes for Easter dinner! They will look so cute on my table and will be filled with yummy sweets.

Here is a photo of the pieces that you need to cut out for this box.

The next photo shows the face and ear pieces glued on as well as the direction the score lines need to be folded.

This photo shows the sides of the box glued together which was the first step in putting the box together.

After the sides are glued together the bottom hexagon piece gets folded up and glued in to cover up the tabs.

Lastly you can see how cute the box looks with a little Easter grass in it and some chocolate.

To close the box, fold in the short sides first, then gather the ears together and secure with some ribbon or twine.  You could even add a bute little pom pom for a tail!   This went together quickly and easily.  Hope that you have a chance to try this one out.  Be sure to look at all of Lori’s SVG files for your Spring celebration needs.  That’s it for me today.

Hugs,

Anita

Ghiradelli Box

Hello crafty friends…Aimee here with you today to share this sweet (and I mean SWEET) little box! This is the 3 Ghiradelli Box Valentine (SVG, Silhouette). It is meant to hold 3 of the delicious Ghiradelli square chocolates and who wouldn’t want that?!?! But you could also size this box up for some bigger sized goodies.

I also want to point out that this box can be stored flat. That means you could make a bunch of these for birthdays and just grab one when you need it. I plan on filling this one with some goodies for my hubby on our anniversary.

Thanks for stopping by today!

Aimee