Dream Big Layout with Princess Dingbats Font + 30% Off SVGs!

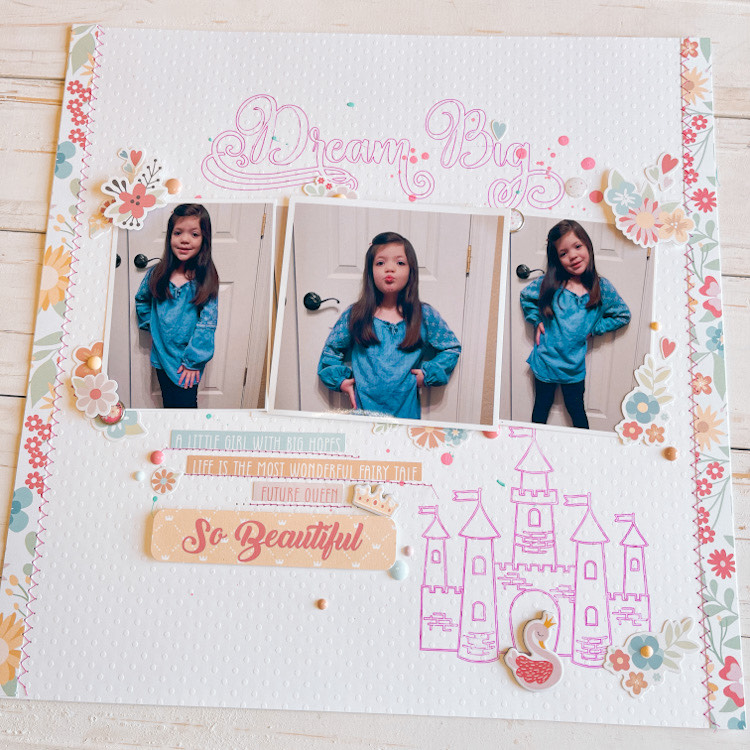
I kept seeing all of these amazing dingbat fonts from Lori….so cute, but how in the world to you use these?!   I really had no clue, but I had just received Lori’s new Our Little Princess collection and really wanted to try something new on a layout.  I just started playing and trying to understand how these adorable little dingbats work.  One really great thing is that you get 26 different designs for one price.  That’s one heck of a deal, one design for each letter of the alphabet.  You can use these for anything… vinyl, paper, sketch pens, the possibilities are endless.

I created this layout using Princess Dingbats in Lori’s Shop or here in the Silhouette Design Store.  There is also a brand new Princess 2 Dingbat font that matches the Our Little Princess collection perfectly.  You can find it here in the Silhouette Design Store too.

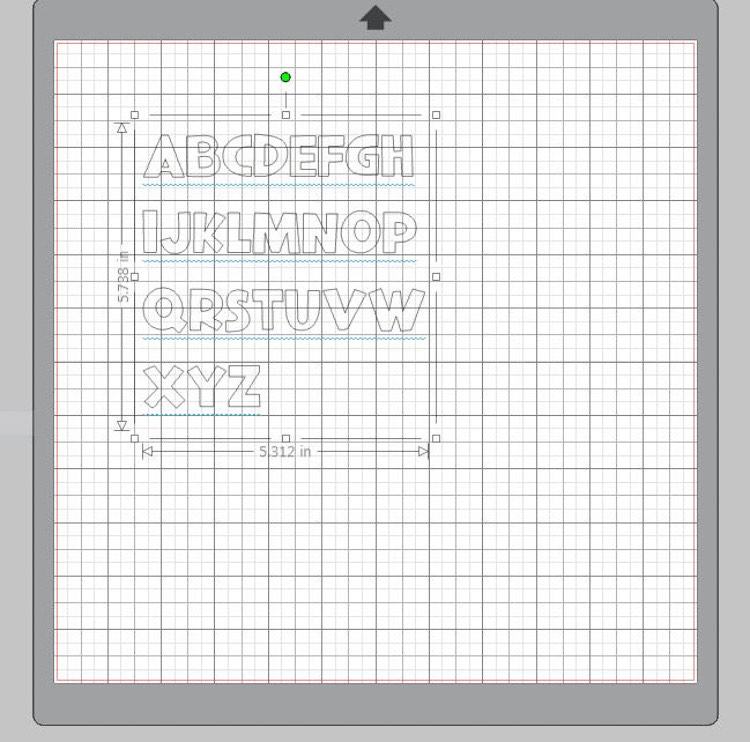
First pick a regular font and type out the alphabet.   I used one of Lori’s fonts and started with the size of 72 point.  I typed my alphabet in sections as seen below.  You want to be able to see all the adorable dingbats, so that is why you use a large point size.

Next, group your alphabet as shown…then the magic happens.

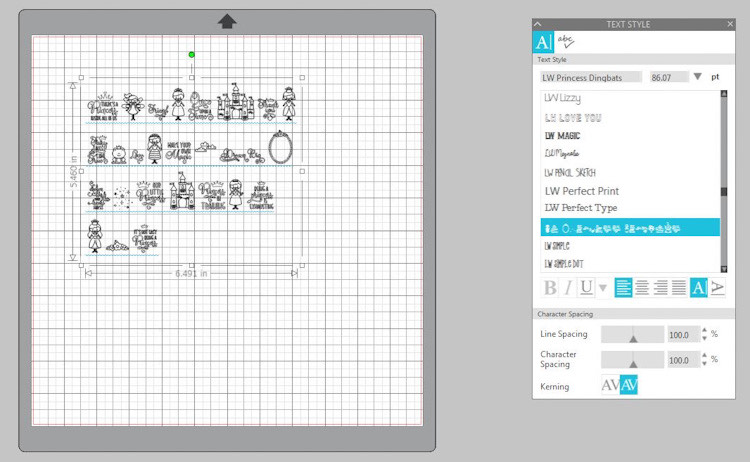
Now go over to your fonts and click on your Princess dingbat and abracadabra!, you now have 26 adorable princess themed designs.

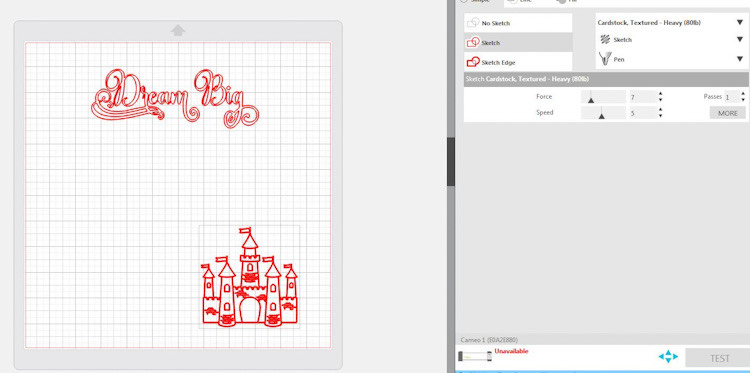
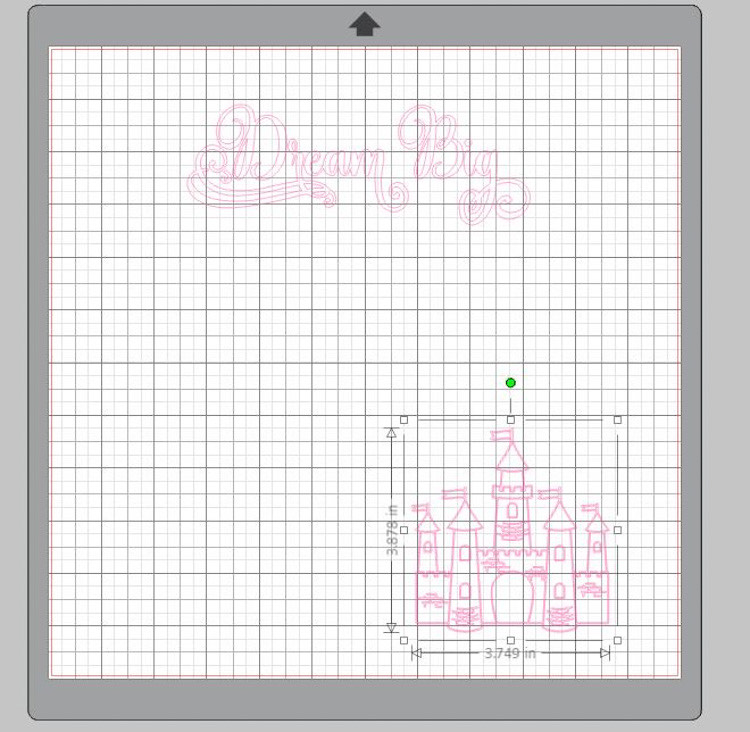
Now ungroup your dingbats just like you would for any other file.  Now that they are ungrouped, you can manipulate them as usual.  I picked the two dingbats I wanted to use, the castle and Dream Big, and deleted the rest.  Here,  you can see where I ungrouped the castle and start to change it’s size and move it where I wanted it to be on my 12×12 page.

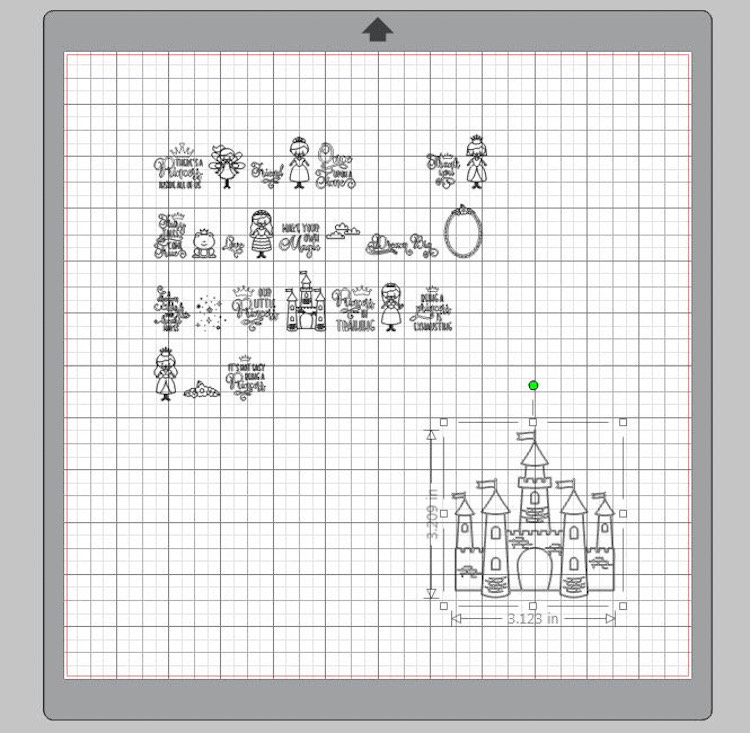
Here,  I have deleted all but the two dingbats that I am going to use.

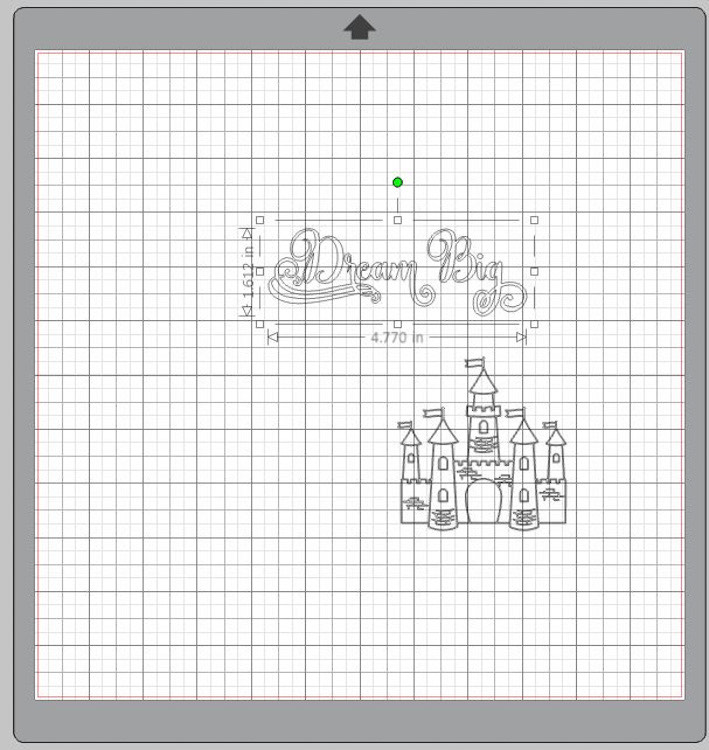
I put my Dream Big title and the castle just where I wanted them to be for my layout.  Next, I added a hot pink sketch pen and let my machine do the rest.  Such a fun way to create.  I will be getting more of these wonderful little dingbat fonts.  The are just way too cute and easy to use.

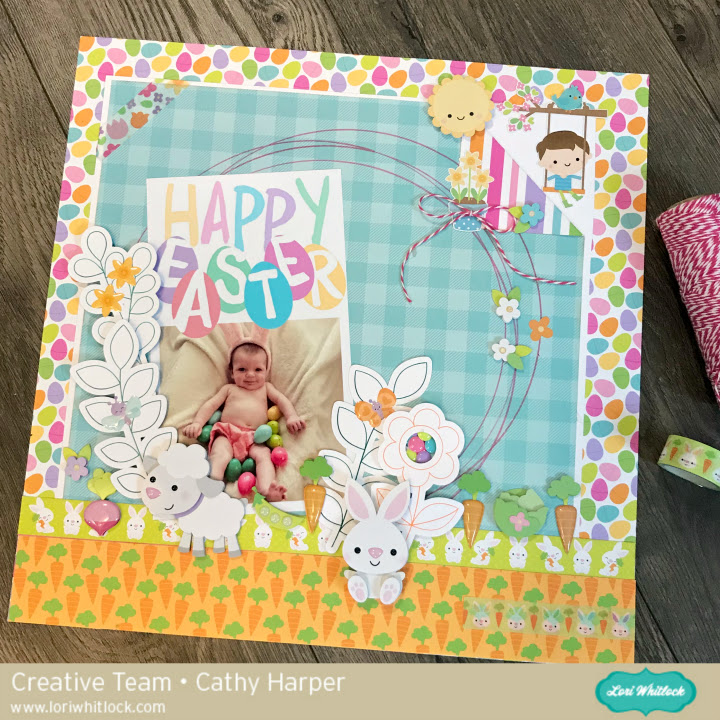
And ABRACADABRA! you have to cutest layout for your little princess!  These girl was born a princess….just look at those poses!


And don’t forget, there’s a sale happening now in Lori’s SVG Shop!  Get 30% off all SVGs, Fonts, Pattern Fills & Commercial Licenses when you use code APR2022 at checkout.  Don’t miss out, sale ends Saturday!


Have a great day!

Cathy

Box Castle Card and Sketch Fonts

Hello!  Today I have a great castle card to show off and a review of some of Lori’s Sketch Fonts.

Image 1

SVG/Silhouette

On the back is a Happy Birthday sentiment.  I decided I wanted to try out some sketch fonts with different pens.  On the card I used the LW Favorite Sketch font. Here are fonts I experimented with:

Tall Sketch Font: SVG/Silhouette

Jordan Sketch Font: SVG/Silhouette

Favorite Sketch Font: SVG/Silhouette

Block Sketch Font: SVG/Silhouette

Dot Sketch Font: SVG/Silhouette

I also tried some fonts that aren’t Sketch:

Delightful SVG/Silhouette

Skinny Minnie SVG/Silhouette

State Heart Dingbats SVG/Silhouette

I’m using the Cricut Explore Air 2 today.  These sketch fonts will also work with other Cricut machines as well as Silhouette machines.  I first used a pen, and I forgot to select Draw for several of the fonts (so some were cut).  First tip when using sketch fonts and pens is to make sure to select Draw for your font.

You can see the sketch fonts are a single line and the other fonts, the machine draws an outline of the letters.  I think they all look great though.  Next I used a 1 mm marker.  This was an older marker, so by the end of the drawing, it is getting a little faded.

I learned that you select the type of pen or marker in the pallet square next to the Linetype selection drop down menu in Cricut Design Space. I think the marker is especially great for the Tall Sketch Font and the State Dingbats font.

Last I tried selecting some fonts with the pen and some fonts with a marker.  The turquoise words are in pen and the gold are 1 mm marker. The machine stops after finishing drawing with the pen, and then tells you to change tools.  You can see what the different fonts look like.  I love having some sketch fonts to be able to add your own sentiments to cards.

The first font in the above picture is the Dot Sketch font (not Block).  The marker writes the Skinny Minnie font really great too.

Well there you go–an exploration in using different fonts with your sketch pens.  Is anyone interested in seeing the Silhouette sketch pens?  We can try that in another post!

And don’t forget,  all SVGs, Fonts, pattern fills and commercial licenses are on sale now in the Lori Whitlock SVG Shop.  Get 30% off when you use code AUG2020 at checkout.  Sale Ends Saturday.

Have a great day!

Ashley


Sketch and Cut Layout with Cathy

Hi everyone!  Cathy here with you today to share a quick tutorial to create this fun layout with Lori’s new sketch files and my Silhouette Sketch pens.  These are the files I used… sketch flower (silhouette), Sketch Flower 2 (Silhouette), Sketch Leaf (Silhouette) and Sketch Circles (Silhouette). You can find them in SVG format in a bundle, Easter Sketch bundle and the Wedding Sketch Bundle.

First add the circle sketch to your mat and size it the size you would like, then center it on your mat.  I wanted to kind of get an idea of how it would look so I changed my line colors.

Next add in the rest of your sketch files and size as you wish.  Again, I changed the line color so I could get a general idea and feel for the layout.  I tried out a number of different layouts before I came up with my final plan.

Separate and move all the files off to the side except for the circle sketch.  Then switch out your blade for a sketch pen in your color choice and let your Silhouette go to work drawing the circle on your background paper.  I love using the pens, so much fun!  If you need help with using the sketch pens, there is a tutorial here on Lori’s Blog.

I removed the background paper, and added a new, white paper to my mat for the other designs.  Add your other sketch shapes to your mat and let the pens do the work.  After you have completed the sketches, make sure not to remove your mat.  Leave it right where it goes back to after it sketches.  Then switch out your pen for the blade again and offset your shapes with the offset feature.

One more step and your on your way to layering and creating your layout.  Offset your images, remove the inside (the original sketch) just click on the inside and pull it away.  I find this easier than selecting the no cut line…seems like I always forget and ruin my project.

Once they are all cut out, layer them on your layout!  Thanks for stopping by today!

Silhouette Tutorial: Sketch Pens

Have you used the Silhouette pens yet?  Well I have and have found that they are so fun to use and very versatile.   Today I have a few simple examples of how you can use the pens and then a tutorial to show exactly how easy it is to create with your own set of pens.
Lori has a bunch of fun Life Cards in her shop and I so I want to show you how you can embellish or journal on these cut files with the Silhouette pens.  My first example is a 3×4 Life Card that has a speech bubble cut into it.  I simply typed a title in the space of the bubble using Lori Whitlock’s cursive sketch font.  I’ll explain the steps on how to draw and cut your shapes below.
My second example uses the same Life Card but this time I am demonstrating how you can use the pen to do your journaling.  No need to do print and cut.  Just use your Silhouette pens. Lori has plenty of fonts to use for your journaling and the pens come in many colors so you’ll really be able to personalize your cards perfectly.
My third example is part of my tutorial.  When cut in it’s original shape, the hearts are actually cut out.  In my version I show you how you can draw the hearts instead of cutting them.  This simple technique will extend the capabilities of your digital cut files tremendously.
I’ve put together some screen shots to show you exactly what you will do to duplicate the card above.

1.  Here is what my original Life Card looks like.  I ungrouped it from the three other cards that came with it and left it the same 3 x 4 size.

2.The first thing that you will want to do is to make sure all of the pieces in the shape are ungrouped.  For this particular file, the hearts and the card shape have been combined into a compound shape because the hearts are normally cut outs.  So before you ungroup the piece, you will first need to, click the image, then go to the top menu and select Image and then Release Compound Shape.  You will then see your shape look like the picture above.  The hearts are there, they are just underneath the card piece.  (Note:  Not all files will require you to release a compound shape.  If your shape is not a compound shape, then you can just ungroup, and move to step 4)
3.  Then select all, CTRL-A, and ungroup, CTRL-U.
4.  Now we are going to go to the Cut Style menu.  This will make it easier for you to see all of the pieces of the file.  As you can see, when the Cut Style menu is open, the lines that will be cut are outlined in dark pink.  Changing the options on each of the cut lines, is how we are going to create using the Silhouette pens.
5.  The first thing we want to do is to select the outside line of the card.  When it is selected, click on the option No Cut.  This will mean that when we replace the blade with the Silhouette pen, that outline will be ignored, or Not Cut.  The pen will only “cut” or draw the hearts.  Do not change the option for the hearts at this time.
6.  Now it is time to draw the hearts.  When you click the Silhouette Cut Settings button, your view of the card will change back and you will only see the card piece again.  Don’t worry, the hearts are still there.
7.  Place your paper on your mat and load it into your machine.  Replace the blade with your selected color of Silhouette pen in the blade holder.  Make sure to close the blade holder by turning the blue piece.  Go to the menu on the screen and change the Silhouette settings to the Preset, Silhouette Sketch Pen.  Then click cut.
When it is done, do NOT unload the mat from the machine.
8.  Now we are going to cut the card out.  Go back to the Cut Style menu.  We want to cut the outside line and not cut the hearts this time.  The easiest way to do this is to Select All, CTRL-A, and then click No Cut.
9.  Then click the outside line of the card, and change that to Cut.
10.  Then go back to your Silhouette Cut Settings.  Take the Silhouette pen out of the blade holder and replace it with the blade.  Lock into place.  On the Cut Settings menu, select the Pre Set setting that corresponds to the type of material that you are cutting.  I was using white cardstock so I chose the Cardstock setting.  When ready, click cut.  Unload machine and take off your Life Card.
Here is one more example of the heart Life Card.  To do this, I selected certain hearts each time I sent it through the Silhouette machine to “cut/draw” and each time I switched out the color of pens to create the rainbow effect.
Lori Whitlock supplies:
Life Cards  (Silhouette Store)
Here & Now 6×6 paper pad by Lori Whitlock for Echo Park
Other Supplies:
White Cardstock
Silhouette Pens- original colors