Valentines Day Projects with Mendi

t’s Mendi here and I’m super excited to be sharing some Valentine’s Day projects with you today!  

I thought it would be fun to make some treat boxes for my daughter’s Valentine’s Day gifts that I “surprise” them with each year.  Lori has so many (MANY) clever cutting files in this department that it was hard to narrow it down to just two!


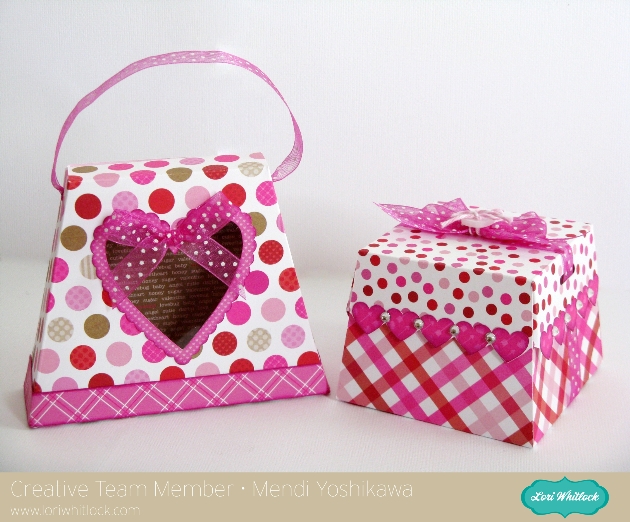
For my first one I used her Heart Window Purse cutting file, using a leftover piece of acetate for the window.  

To create a border along the bottom that followed the curve of the folded box, I duplicated the shape and used my knife tool to cut away the top portion approximately 1/2″ from the bottom.  Afterwards I just created an offset of approximately .02 so that it would have a little extra room to go over the thickness of the original box.  It worked surprisingly well and was so much easier than trying to maneuver my paper around the angled shape later.  


For my second treat box I used Lori’s adorable Heart Lid Box.  I kept this one pretty straightforward and had fun embellishing it with rhinestones and ribbon.  


Make sure to take a look at all the amazing 3D Boxes and Valentine’s Day shapes Lori has to offer.  They will have your mind spinning with all sorts of ideas!  🙂

Silhouette tutorial with Mendi: Shaped Cards

I’m so excited to be sharing one of my all time favorite ways to use Lori’s adorable cutting files:  Shaped Cards!!!

There are so many different ways to approach shaped cards.  For my first card I took Lori’s Santa Tote and cut off the flaps that formed the box and removed the hole in his hat (which formed the handle) to transform it into a cute card instead.


For my second card I used Lori’s Present cutting file into a card, pairing it with her button cutting file to form the knot on the bow.  I also elongated the bow and bottom portion of the gift to so that the overall dimensions of the card would be 4.25 x 5.5 inches to perfectly fill an A2 sized envelope.  To form my card base I cut 2 of the overall outline of the gift from white cardstock by welding all the shapes together.


For my snowman card I transformed another one of Lori’s treat box using the 3D Snowman Tote cutting file.  Once again I removed the circle handle in the top and instead cut a bigger circle to form a pom-pom for my snowman’s hat.  Rather than cutting two to form my card base, I mirrored my base shape and overlapped the two ever so slightly and welded them together, using a bone folder to create my crease and fold the card after cutting.  To give a little shine to the eyes and mouth, I added glossy accents.


For my Nativity card I cut two of my background shape from the blue cardstock to form my card base and scored the back piece along the top so that my score line was parallel to the bottom of the card.  Martha Stewart’s Score Board is an awesome tool for this.  I then just added adhesive above the score line and adhered it to the other card base piece.

I printed my sentiment on the computer using iridescent gold paper and popped the top portion up with foam tape.  I finished off my card with random dots of Stickles “stardust” glitter glue to give the look of a star filled sky.


This last card is a favorite of mine using Lori’s Ice Skate diecut from her Christmas Winter Set (available in the Silhouette store). To create my card base I used the same method as I did on my nativity card.  To give my skate a more realistic look I also chose to cut the blade from iridescent silver paper.

I had so much fun embellishing the skate!  I chose to discard the curly cutout for the laces and instead used my We R Memory Keepers Crop-A-Dile to set a row of eyelets along the edge.  I then ran bakers twine through them and added a bow to the top.  To ground my sentiment I slipped one of Lori’s snowflakes behind a basic circle.


If you’re like me I do better with a visual example so I’ve created a video tutorial showcasing a couple different techniques I’ve utilized to create my shaped card bases.  🙂


Just to recap, today I’ve used the following cutting files designed by Lori which are available to purchase in her shop:
I hope you’ll give shaped cards a try! They’re so much fun!  🙂

Christmas Layout with Mendi

Today I have a layout and card to share using several of Lori’s SVG shapes along with her This & That Christmas Collection which she designed for Echo Park last year.


I made this quick and simple layout for my Mother-in-law’s 8×8 album (although the design would work well as a 12×12 layout as well).  I love the instant impact and style Lori’s Pine Bough & Ornament cutting file gives the page.  I cut it out the boughs several times and positioned them to create my visual triangle.


I finished off my layout by using the sentiment from Lori’s Christmas Season’s Greetings Card for my title and adding a shadow around it to help it stand out against my ivory background.


While I had my papers out, I decided to create a quick shaped card using Lori’s Joy Banner cutting file too. To create my card, I discarded the banner portion of the cutting file and enlarged the word “Joy”.  I cut the word once as is with the red patterned paper and then once again from ivory without the circle cutouts to back my red letters.  

To form my card base I added a large shadow using the “offset” feature, making sure to size my entire design to be 5.5″ wide before cutting anything out so that it would fit perfectly in a A2 sized envelope.  I then ran the ivory “O” through my printer (attached with temporary adhesive to a piece of office paper) to complete my sentiment using Lori’s Vintage Font.  I finished off my card with a little bit of Stickles “stardust” Glitter glue applied to the cutouts for a bit of sparkle.  This card would be so easy to mass produce (and is nice and flat for mailing too).  🙂


Just to recap, today I used the following cutting files designed by Lori:
I’ll be back on November 21st with a video tutorial sharing more tips and tricks on creating shaped Christmas cards with Lori’s fun cutting files.

Silhouette Tutorial: Organizing Your Shapes by Mendi

Are you finding yourself with a growing collection of SVG files which you’ve acquired from outside the Silhouette store?  While it is fairly easy to import them into your Silhouette library, I’ve found myself really missing the color thumbnails that come with the shapes purchased directly from the Silhouette store.

I’m happy to say that with a little creativity I was able to find a couple different ways around this which have solved this problem and made a huge difference for me when I’m searching for the perfect shape from within my personal library!  Today I thought I would share my little tricks with you… (On a side note, make sure to click on the gear in the bottom right-hand corner and select 1080p to view the video at the highest resolution).


Of course no blog post seems complete without a project to share so I decided to create a card with the cutting files used in today’s video.


This card was made with the beautiful Reflections: Fall collection which Lori designed for Echo Park.  For my pocket, I used Lori’s folder cutting file by stitching down the sides and inserting a journaling card from the collection for a fun interactive element.


I hope you’ve found the tutorial helpful.  😉

Layout by Mendi + Canvas by Traci

Today we have two beautiful projects to share with you by Mendi and Traci. First to share with you is Mendi.
I’m so excited to finally be sharing this layout today!  I actually started this one back in May and was just waiting for the perfect moment to share it between all the Summer and Fall themed occasions.  For this project I turned to my all time favorite collection of Lori’s called Summer Days which she designed for Echo Park, along with a number of her awesome cutting files.


I’ve had this photo of my daughter in my photo box for nearly 4 years waiting for the perfect rainbow inspired layout to use it on.  As soon as I saw Lori’s doily cutting files I knew it would be so much fun to cut each one from a different color for a clean and simple layout.  I love the way they look cut from the different solid colors from the collection!


If these shapes look like a bit of fun to cut out, you would be correct.  They definitely leave their fair share of confetti on your cutting mat so make sure to have a scraper or old gift card handy to get all these little guys off. These beautiful doilies were more than worth the tiny bit of extra effort though.  😉


To complete my layout I used the following cutting files available for purchase in Lori’s Shop:
Next up we have Traci with a beautiful wall hanging.
Happy Fall everyone!  Do you love this time of year as much as I do?  The colors of the leaves, the cooler temperatures, the sweaters … love sweaters!  I have a great home decor piece to share with you today since fall is officially here.  Lori’s 6×8 Canvas set is such a fun project and so versatile — you could make one for each season!  The cutting file comes with even more than you see here — not only are the two hanging “canvases” included, but 4 different mat shaped backgrounds are also in the file!  You could hang two like I’ve done here, or hang three, or even more!
The paper collection is one of my favorites this season — Echo Park’s Reflections Fall, designed by Lori.
I also love Lori’s title “A Thankful Heart is a Happy Heart“.  You can find it with 4 other fall titles in Lori’s shop, or in the Silhouette shop.
Thanks for letting me share this canvas wall hanging with you!  Please stop by my blog and say hello today!  I’ll be giving away a $10 Silhouette download card to one lucky winner!
Have a wonderful week!
Traci