Guest Designer Mitsyana Wright

Happy Saturday! I hope everyone has had a great start to their weekend! I am Mitsyana Wright, from Up On Tippy Toes, and I am so excited to be guest designer for Lori Whitlock. I’ve always been a big fan of her unique and whimsical designs. And I am over the moon thrilled to be able to share with you this adorable Unicorn Card I made using her Center Box Card Unicorn.

I’m a card maker and obsessed unicorn lover, so this unicorn card was just up my alley! I started by opening the card file in my electronic cutting machine software. Because Lori Whitlock’s files are SVG format I am able to use them in a number of electronic cutting machines.

When I open the file in my software , all the shapes are grouped together like this…

I like to separate my shapes by like colors. Then I can place several different colored papers down on my cutting mat and cut them all at the same time.

Here are all the pieces for the card cut out…

These pieces go together very easily and you simply adhere them to the card base… this is totally cute as is but I like to add personal touch with shading and more dimension.  I like to add shading with a bit of airbrushing. It’s a great alternative to shading with ink pads and sponges.

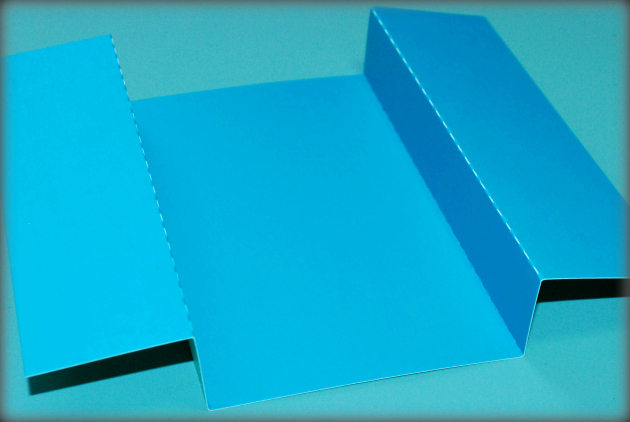
After my pieces were all airbrushed I started on building the card…  I folded the card base on the score lines, making the center panel recessed.

For added dimension, I added embossing to these background panels, then distressed the top layer of the embossing off with a sanding block. This exposed the white paper core everywhere the embossing was raised.

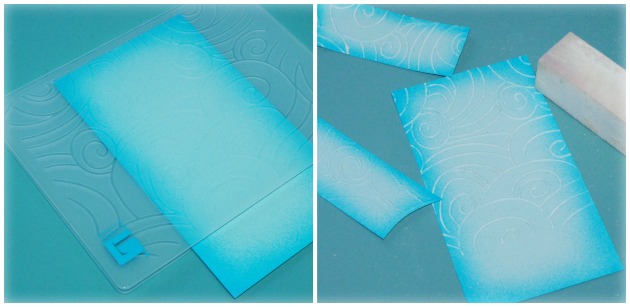
Because of the added texture of the embossing, I ran my panels through my sticker makers for maximum adhesion to my card base.

Then attached them to the card base.

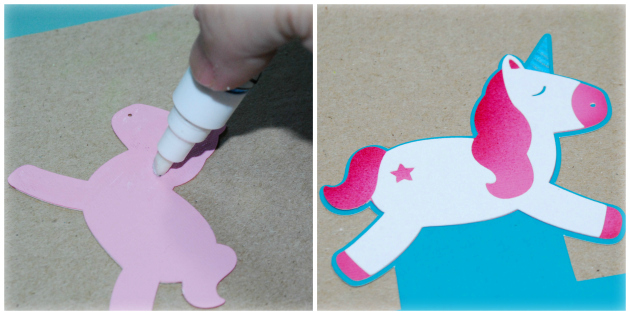
 I used a glue pen to piece the smaller parts and pieces together.

I folded the little score lines on the unicorn base and attached them into the inside fold of the card. and then attached the hills over top.

I added highlights with a white gel pen onto the unicorns main and tail, as well as the rainbow.

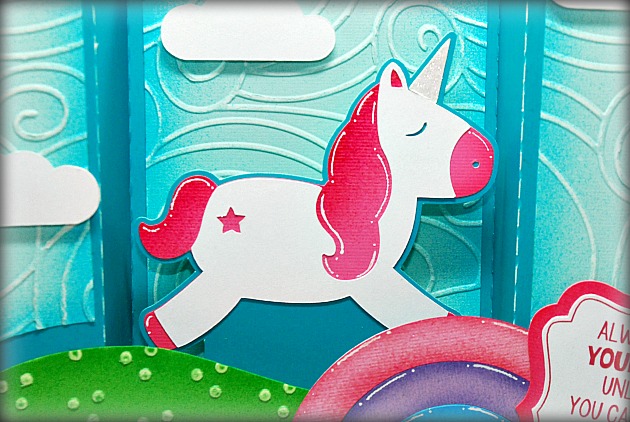
Then place my sentiment onto the lower left corner.

This card turned out fantastic! My only problem would be which one of my unicorn loving friends to give it to!  Hope you all enjoyed this project!!  Have a MAGICAL day!!

Easter Cuties with Guest Designer Brigit Mann!

Hello everyone!  It’s Brigit from Brigit’s Scraps, I’m so excited to be guest designer here today.  I was on Lori’s Creative Team a couple of years a ago and had the best time.  I love creating projects with Lori’s cut files, they are truly some of my all time favorite files to work with.

With Easter just around the corner I thought this shaped bunny card with shaker basket would make a cute gift set.

I used the bunny and carrot from the Easter Icon Set (here in the Silhouette Store) and the sign and pole from the Fishing set.  I placed all the files how I wanted them in Silhouette Studio Designer Edition and then did an offset.  I cut out two of the offsets and scored straight across both ears about an half inch down on one of them.  I then glued the two layers together above the score lines to form my base card.


This shaker basket (here in the Silhouette Store) is just darling and it’s so simple to put together, I love it!  You just need to glue the bottom and inside liner, the brads hold the sides together.  All the paper used is from Doodlebug Design.

Hope you have enjoyed these projects, thanks so much for stopping by and have a wonderful day!


Guest Designer Jennifer Beason

Hello, everyone! Much to my kid’s dismay, the new school year will begin for them next week. With this in mind, I thought I’d make a project with a “back to school” theme.  Using Lori’s 11.3 x 11.3 shadow box and some other school related files, I created this.

I started out by making the shadow box out of thin chipboard.  Then I covered the sides and each compartment with patterned paper.  I had some thin sheets of cork and thought it would be fun to use on this project as well.

The “Back to School” title was cut out and pieced together, then embellished with some chipboard cutouts.

I just used the 1,2 and 3  from the number border.  I cut these out of thin chipboard, which I layered together to give some thickness. The numbers were then handstitched and embellished with rub-ons, buttons and a chipboard star.

The apple and atom were also made out of layered chipboard.

The “Learn, Grow, Smart, Achieve, Think” phrase was cut from cardstock. To add some color I filled in the center of some the letters with coordinating patterned paper.

The last compartment was embellished with a mini banner and a chipboard pencil, along with other embellishments from my stash.

Thanks for joining me today,

Jennifer


Cutting Files Used:

School Apples

School Phrases

Number Border

School Titles

Shadow Box

Atom

Banner Set

Pencil


Guest Designer Jennifer Beason

Hello, everyone. It’s such a pleasure to be here with you today. I am a huge fan of Lori Whitlock’s and jumped at the chance to be a guest designer when I was asked. I hope you enjoy my project as much I enjoyed creating it.

If you’ve seen my work before, this project may look a little familiar. The original was created as a gift box for my son’s teacher last year.  But a good friend wanted me to create a similar piece, for a party, she is having next month. Here’s the design I came up with.

The watermelon box was made as the base and to hold everything together. I used thin chipboard to make the box first, then covered it with patterned paper. I added waves to the top of the box and some fun starfish.

The phrase “are we there yet” and a 3d flower were glued onto to a die-cut popsicle and positioned to the right of the box.

The castle was attached to some wood dowels and glued to the inside of the watermelon box. To make the sunglasses look more realistic some 3d crystal lacquer was applied.

The sand pail was constructed and tickets were glued inside. The pail was then glued in place on the castle.

To add some pops of color pinwheels were added, as well.

Thanks so much for joining me today.  Wishing you all a safe and happy Summer!

Jennifer

Files used:
Watermelon favor box (in Lori Whitlock SVG Shop here)
Castle (in Lori Whitlock SVG Shop here)
3d layered flower (in Lori Whitlock SVG Shop here)
Sand Pail shaped box  (in Lori Whitlock SVG Shop here)
Ticket Set  (in Lori Whitlock SVG Shop here)
6 tickets  (in Lori Whitlock SVG Shop here)
Heart Arrow set  (in Lori Whitlock SVG Shop here)
Are We There Yet?  (in Lori Whitlock SVG Shop here)
Beach Set  (in Lori Whitlock SVG Shop here)
Flip-flop box  (in Lori Whitlock SVG Shop here)
Pinwheel
Sun
Sunglasses, waves and fish


50% OFF Last Chance + Christmas Décor with Courtney Lee

Don’t miss out!!!  Today is the final day of our huge Christmas Sale!!  Get 50% off an order of $20 or more, no code needed!  It’s the perfect time to stock up on all those items on your wish list!  Maybe this next project by guest designer Courtney Lee will be part of that list… check it out!

Hello all you Lori Whitlock fans!!! It’s Courtney Lee from Court’s Crafts here today to share with you how much FUN I had making this home decor project! If you love to layer, this is for you!!!  I fell in love with this 3D Frame Decor Christmas Tree (HERE is the link to Lori’s Shop)(HERE is the link in the Silhouette shop) right away. I had to have it. I cut out all the parts using some Doodlebug Designs paper. Since the layers are color coordinated it was super easy to put together.

Now comes the fun part – layering and decorating! I stitched around the edge of the cream layer. I wasn’t going to because, well, I am not the best “stitcher”, but I just went really, really slowly and I think it turned out really nicely! Don’t be afraid to try it. The worst that will happen is you have to cut a new piece. Tip: start at the bottom as you are going to cover it up with presents anyway! 😉

I used various layers of foam adhesive and even stacked the foam adhesive dots on top of one another to get the amount of layering I wanted.

I added some Stickles to the star, bows, and presents. Something about Christmas makes me want to sparkle EVERYTHING! 😉

Next I added some sprinkles (sparkle enamel dots) to the tree and the presents. I attached my sentiment directly to the bottom of the box.

I grabbed a little gingerbread man doodlepop and a heart sticker as well as a mini paper clip and added them to the bottom.

I finished it off with some holly enamel shapes and voila! Adorable home decor piece. I love that it stands up on it’s own and folds flat for storage. This one is going to be one of my favorite things to put up every year and the fact that I made it from scratch only makes it more special.

So if you have been wanting to try some home decor for the holidays and are being just a little shy, grab the 3d Frame Decor Christmas Tree cut file and give it a whirl! I promise you will be so happy with the result and how easy Lori’s files make it!