Thanksgiving Décor with Guest Designer Michelle Gallant

Hey everyone,  Michelle Gallant here today sharing a quick and easy Thanksgiving project using the 3D Turkey (SVG, Silhouette) the 3D Small Pumpkin (SVG, Silhouette)  and papers from the Happy Fall collection from Echo Park Paper.

This cute turkey was super easy to make.  Just 2 little boxes to assemble and all the other pieces were flat.  He would make such a fun centerpiece for a Thanksgiving dinner
The pumpkin was also easy to make.  I always use liquid adhesive for 3D projects because I want to make sure it’s glued really well, especially for a round shape like this.  The stem and the leaves are my favorite part of this pumpkin.  So sweet!
Thanks for stopping by!
Michelle

Camping with Guest Designer Michelle Gallant

Hey everyone,   Michelle Gallant here again today with another guest post.  Everyone who knows me, knows how much I love spending time at my camper in Prince Edward Island.  It’s truly my happy place.  I haven’t been able to go yet this year because of the pandemic situation but when I do go I’ll be bringing this cute camper with me!

I used the 3D Camper Large cut file (Silhouette, SVG) and the Carta Bella Summer Market collection.  I love how the bright colors made this into such a fun decoration!  I have the perfect little shelf to display this in my camper!
The little details in this cut file are adorable.  Those little window awnings are the cutest ever!
Thanks for stopping by!

Guest Designer Michelle Gallant

Hey everyone, my name is Michelle Gallant and I’m so happy to be a guest for Lori Whitlock this month!  I’ve been using a lot of Lori’s files lately, especially the 3D files, and they are absolutely the most fun projects to make!

For my project I used the 3D Gazebo (SVG, Silhouette) file along with the  Lovely Moments collection from Pebbles.  This is seriously the cutest thing I’ve ever made.  My daughter has already claimed it for her bedroom! lol
I used the Rolled Flower Set 2 (SVG, Silhouette and Silhouette) to decorate the railing of the gazebo, they added the perfect touch of color and dimension.
To finish off my project, I added some tulle inside the gazebo to create some sheer curtains.  It turned out so sweet!
Don’t you think this would be a pretty decoration for a wedding or anniversary?
Thanks for stopping by!
Michelle

Guest Designer Moriah McDonald

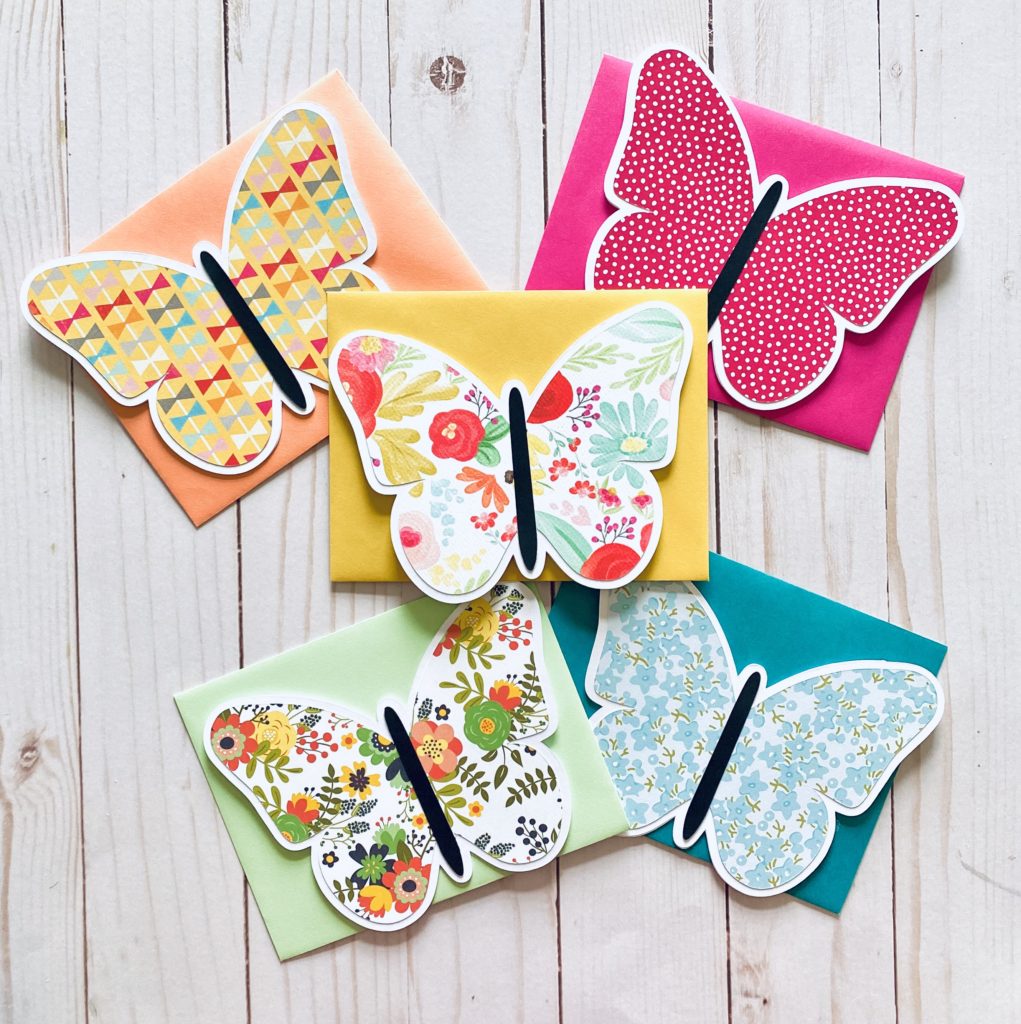
Happy Shiny New Day Friends!  It’s Moriah Macdonald from Fuzzy Slippers Designs fluttering by today to share my Butterfly Card Set made using Lori’s Butterfly Shaped Card (SVG, Silhouette).  I am so super excited to join all of you today and to share my creations thanks to Lori’s amazing cut files!! Every year around this time I start wishing for all things flowers and butterflies.  It can be a bit tricky up here in New England cause we had snow and then were 80’s all just last week!  While I wait for the butterflies to show up in real life, I can quench my desires with these SUPER EASY and SUPER FUN cards.  I think we can all use a little easy these days. Am I right?!?

Look at all the parts you get when you download this Butterfly Shaped Card (SVG, Silhouette)! It will cut you the fold-over card, a butterfly base, the smaller shaped butterfly that you cut from pattern paper and mount on the base, and the butterfly abdomen.  All are sized to cut an A2 card, so all you need to do is decide with pattern papers to use!!! (Full disclosure-that was THE HARDEST PART for me. LOL!)

Pro-tip Number One- The abdomen of the butterfly is a little larger on the bottom.  Play around with it BEFORE you glue to make sure you have figured out which end is up. I glued the abdomen onto the pattern paper and then glued all of that to the white butterfly base.

Pro-Tip Number Two- When you go to glue everything to the card base, add the glue to the foldover card.  In order for the foldover to work the wings need to be shorter on the foldover base.  That means your pretty butterfly that you just glued together in the previous steps is going to stick out over the top of the foldover and you don’t want the very tips of the butterfly wings to have sticky glue and mess up your beautiful creation! 

Easy-peasy right?!? These would make a great craft kit to occupy the kiddos!  Cut all the parts and the next rainy day pull out the kit.  The kids can put together the cards and then write notes to loved ones to drop in the mail. The size is just right for an “I love you” or “Happy Birthday” message from a kiddo.  Everyone loves happy mail!!!

Hope you were inspired to try this! Please tag me if you do @fuzzyslippersdesigns. I’d LOVE to see your butterfly creations!!!

Happy Crafting!

Moriah

Guest Designer Brigit Mann

Hello, everyone, it’s Brigit from Brigit’s Scraps here today. I would like to thank Lori for having me back as a guest designer, I’m so happy to be here! I have a Fourth of July project to share using the 3D Star Shaped Box (here in the Silhouette Design Store.)

The box is very easy to put together, I punched two holes on the side to add the wire handle. The designer paper is from Doodlebug Design’s Yankee Doodle collection, perfect for this star box.

I also used the 3D Rosette (here in the Silhouette Store) and embellished with a Doodlebug button, sentiment, and some twine.


Hope you’ve enjoyed this project, thanks so much for stopping by and have a wonderful day!