
Hi everyone- Its Tya here to share with you a fun and easy Silhouette tutorial! I love using Lori’s shapes in all sorts of fun ways. Today I wanted to share with you how to add a custom sentiment to a card front. 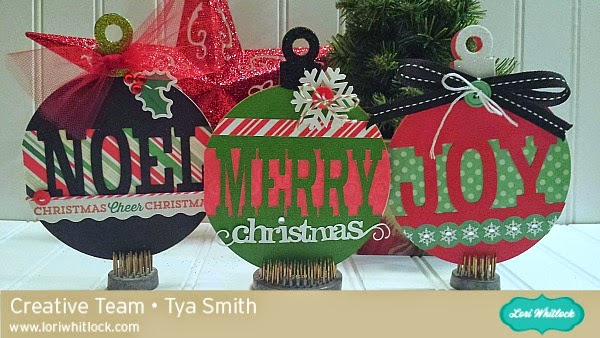
For my card base I used Lori’s A2 Snowflake Ornament Card that you can find here in her SVG shop and here on the Silhouette website.
 As you can see, I removed the snowflake from the card front and added some festive holiday sentiments on my card front instead using the handy subtract tool in the Silhouette software. Let me show you the steps that I followed to make the cards.
1- Ungroup the shape and delete the snowflake.

2- Grab the card front. Using the Draw a Rectangle tool, draw a 1.5×4.5 inch box right in the center of the ornament.
3-Open the modify window, select both shapes, and then click on subtract.

4-You will now have the top and bottom section of the shape with a space in the middle.

5- Type out your sentiment. I typed the word Merry in all capitals using the LW Block font I downloaded from the Silhouette store. I suggest using block fonts, or fonts with a serif on them for this technique. I also like to use capital letters just to make things easy and even. Resize your sentiment so that the letters slightly overlap the top and bottom lines of our space we cut out of the middle.
 6- Select just the top section of the ornament, right click and click on make a compound path. This keeps the hole in the top section of the ornament.

7- Select the whole shape, right click and select Weld. You can see now that the shape of the ornament is still intact, and we added a custom sentiment to our card front – this is a fun way to add a personal touch to your cards and to get more use from your card shapes.

Here are all the cards I made using this technique. I really enjoyed using Lori’s Christmas Cheer Echo Park paper line for my cards. The colors just pop! Love it! For this card, I used the Merry Christmas flourish phrase found here and here.


 Thanks so much for stopping by today and letting me share this tutorial with you! I hope that you will give this nifty technique a try! And I would love it if you would stop by my blog and say hi! Happy Holidays and Happy Crafting!
Thank you for providing a tutorial, this is one I don’t know that I would figure out on my own. I love the idea! Thank you!
I just ordered a Silhouette and I am so excited to find this tutorial. It reminds me of dies that I have seen and loved.
Awesome idea and super cute cards! 🙂