
Happy Thanksgiving! I hope your day is filled with great food, friends, family, pie, etc. And if you like shopping this weekend, I hope that you get all the deals you are looking for. I think there are many crafting deals that can be enjoyed right from your home and your favorite internet browser.
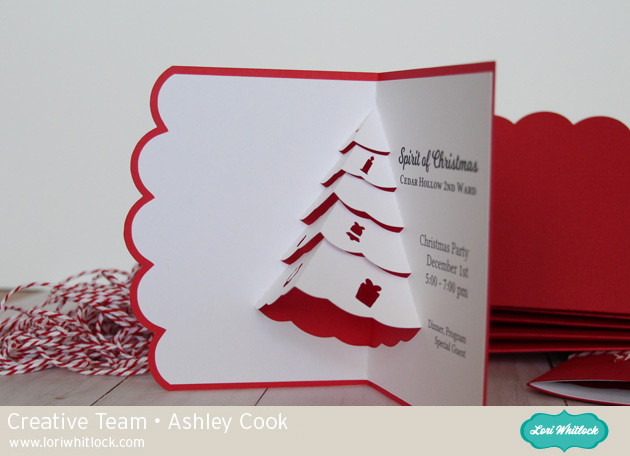
I am helping plan a Christmas Party for our church congregation. We wanted each family to have a special invite. So I searched for a pop-up card that I could make many. I found this great Tree Pop-up (Silhouette, SVG shop).

I decided to do a little editing. Before I un-grouped the card, I resized it just a little so that the outside of the card would fit onto a 8.5 x 11 piece of paper.

Then I did a little point editing. To add points to a design, double click on the shape, and click where you want to add a point. For this project, I chose the point to be a corner, then I manipulated the curves to the shape that I was going for.

At our Christmas Party, we will have a program about some of the symbols of Christmas. I wanted to incorporate that into the card. I used images from Lori’s Dingbat Christmas font (Silhouette, SVG Shop). Since these shapes will just be an outline in the card, I deleted any extra pieces by un-grouping, releasing compound path, and deleting any of the inner pieces.

With all the symbol images placed, I added text. Since my text isn’t too near the cuts, I decided not to do print and cut, so that I could get 2 cards for every piece of cardstock. I saved just the text in the correct format as a PDF and took it to the copy store to print. After printed, I cut 100 cards (well the Cameo did the cutting).

I am tying them up using a cute tag from Lori’s Tag Dingbat font (Silhouette, SVG shop).

I think they are pretty cute. I hope everyone likes the special invites. Now only 99 more to tie :).

Happy Thanksgiving!! And Happy Shopping!