June Creative Team Blog Hop

Welcome to our June Creative Team Blog Hop! ☀️✨ Our talented designers have been busy creating beautiful projects filled with inspiration, creativity, and fresh ideas. Be sure to visit each stop along the hop to see all the amazing creations—you’re sure to find something that sparks your next crafting adventure!

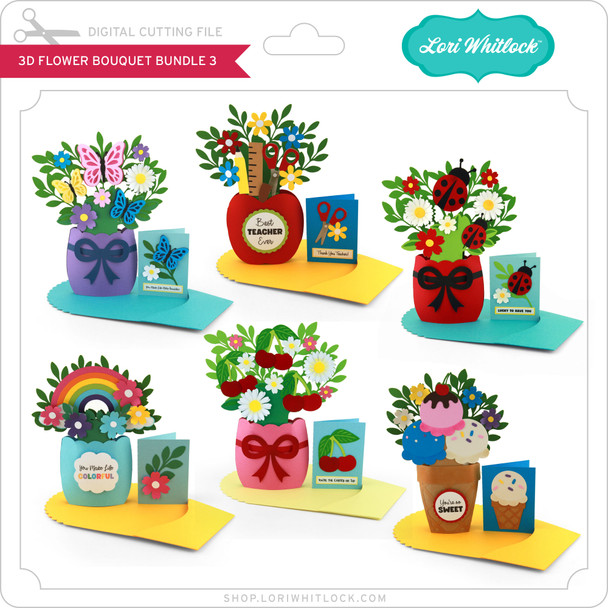
From June 9–13, enjoy 30% OFF all digital files at Lori’s SVG Shop — including commercial licenses! Use code JUN2026 (case-sensitive) at checkout and stock up on new designs for all your upcoming projects. SHOP HERE.

As a thank-you for hopping along with us, we’ve got a little treat for you! For today only, you can download the A2 Insert Card Father’s Day SVG file absolutely FREE. Simply add it to your cart and complete checkout—no codes, no catches, just a fun gift from us to you.

– NEW RELEASE –

🎄✨ I know it may only be June, but if you’ve been following the trends in the Lori Whitlock Shop, you already know that 3D Bouquet Cards are one of the hottest file styles right now! They have quickly become a customer favorite, and I’ve been hearing from so many of you who can’t get enough of them.

One of the biggest requests I receive every year is for Christmas projects to be released early so you have plenty of time to craft before the busy holiday season arrives. So I thought, why not combine one of our most popular card styles with everyone’s favorite holiday?

I’m excited to introduce my brand NEW 3D Christmas Bouquet Bundle! These festive bouquets feature layered holiday elements tucked into adorable gift box containers, complete with coordinating Christmas cards. They’re the perfect combination of card and décor, making them a wonderful handmade gift that recipients can display throughout the season.

I’ve also got an assembly tutorial over on my YouTube channel HERE!
✨ And the best part—grab them for 30% OFF this week only with code JUN2026. Don’t wait… this deal won’t last!

***CLICK HERE TO GO TO THE SHOP***

How about a giveaway? You’re in luck! Enter our giveaway below, and we’ll announce the winner on the entry form right here on this blog post. Keep an eye on your inbox—you might be the lucky winner!

Be sure to visit all of the Creative Team member blogs listed at the top for even more inspiration. Thanks so much for stopping by, and happy crafting!

~Lori

3D Rainbow Bouquet

Hello crafty friends, Noelene here today to share another card from the gorgeous 3D Flowers Bouquet 3 release from Lori Whitlock called 3D Rainbow Bouquet (SVG), (Silhouette).
I used foam squares to raise my flowers. I embossed 1 of the vase panels with a pretty swirl & heart embossing folder. I decided to add a cute little unicorn to my card so I used one of the unicorns from Doodlebug Design’s Fairy Tales Collection (SVG), (Silhouette). Lastly I embellished with some sprinkles & added my sticker from the coordinating Doodlebug Design Fary Tales Sticker Sheet.
The bouquet also comes with a coordinating bouquet envelope wrapper & a cute little matching mini card.
For more value make sure you check out the rest of the elegant 3D Flower Bouquet Bundle 3 here.
For more inspiration, check out my Instagram!
Thanks for stopping by!
Hugs
Noelene 🙂

5×7 Barn Easel Card Tutorial

Hi there! Today I am sharing an assembly tutorial for the 5×7 Barn Easel Card Patriotic (SVG, Silhouette). This barn card includes several elements, but the assembly is straightforward. Each piece has at least two layers. Start by gluing down the barn stripes, followed by the roof trim. Assemble the door and windows, then attach them to the barn. Center the wreath around the top window and glue the banner to the middle of the barn. Finally, align and attach the small fence along the bottom and right side of the barn.

The card base consists of two pieces. The top piece features two score lines that are folded as mountain folds. The end fold is glued to the back piece, forming the card base. Attach the green grass strip to the front of the card at the open edge. Apply glue only up to the middle score line on the card base, then center the barn over the glued area, aligning it with the bottom of the card. The truck can now be glued to the front of the card aligning it to the bottom and left side of the car.
The sentiment is glued inside the card near the center. Adding foam dots to the back of the sentiment will help keep the card open, though they are optional.

This barn card is darling and makes a festive decor piece for the recipient. Be sure to check out all of the available options in Lori’s shop. Thanks for stopping by today!

Brandie