5×7 Barn Easel Card Tutorial

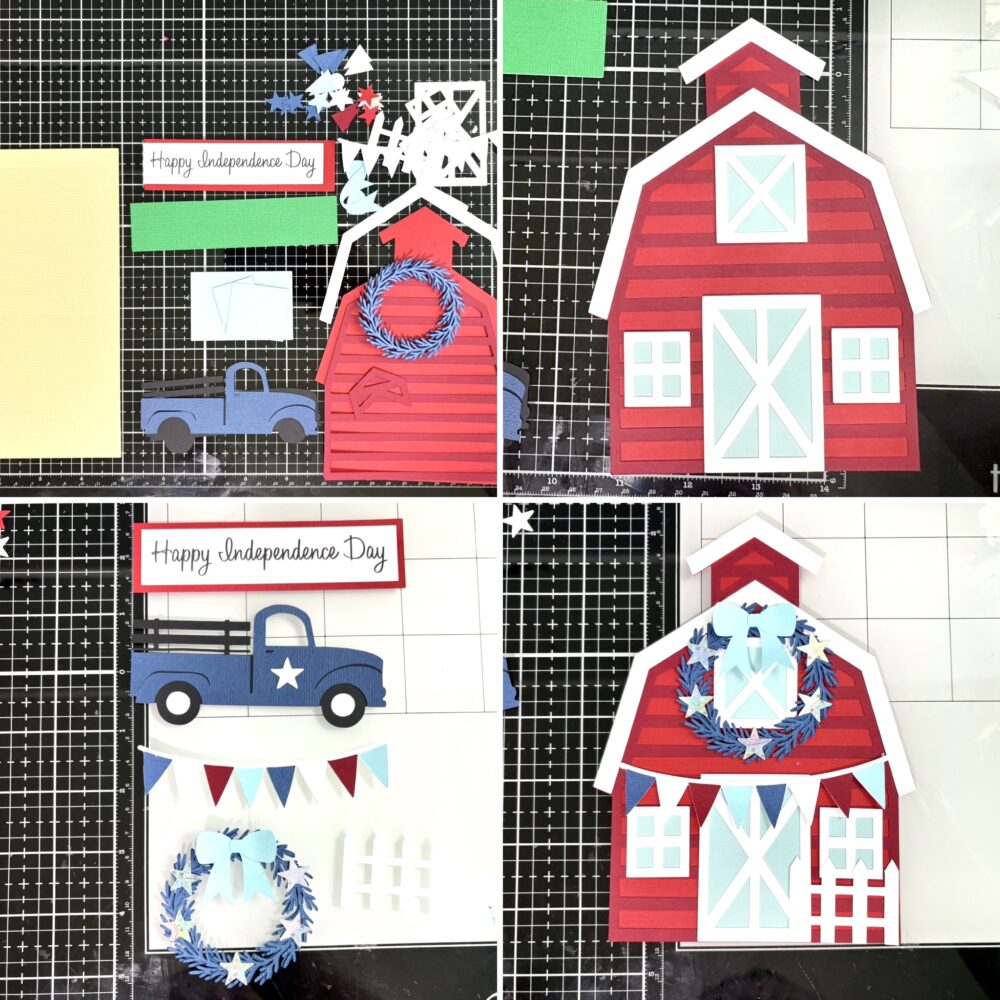
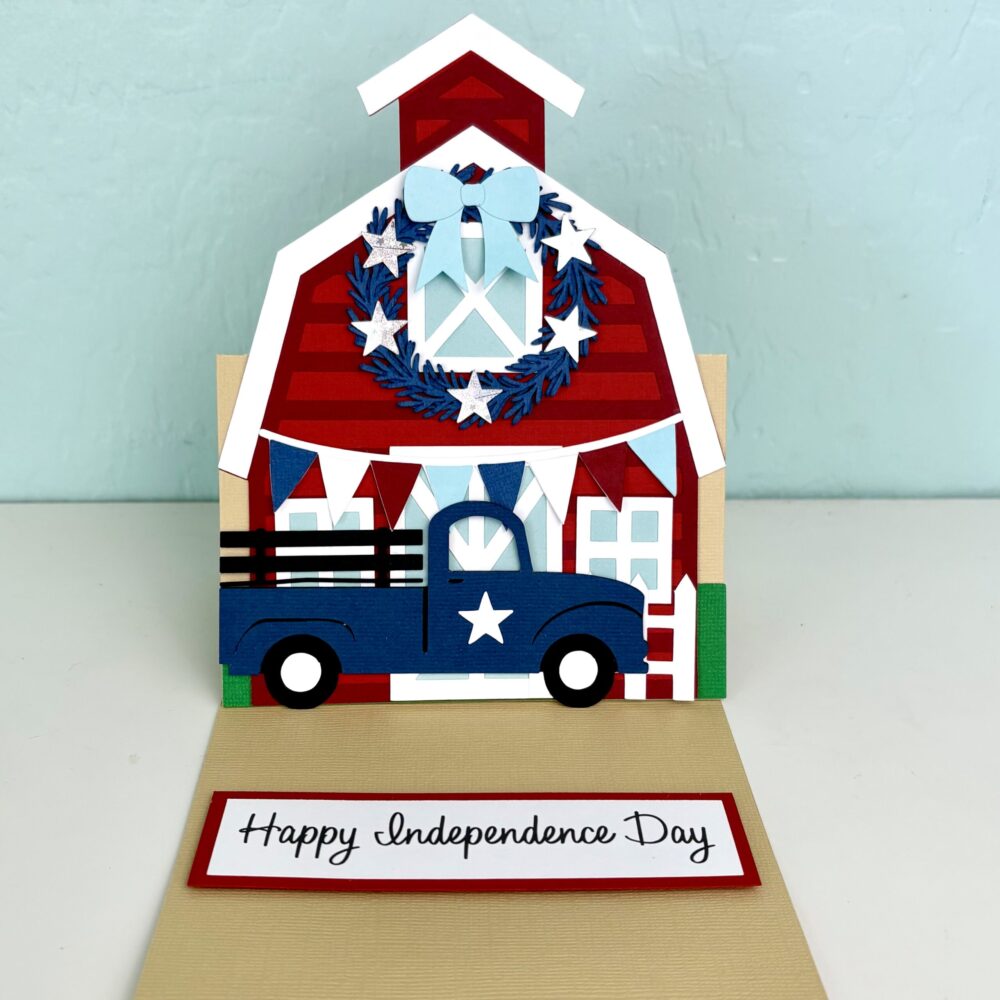
Hi there! Today I am sharing an assembly tutorial for the 5×7 Barn Easel Card Patriotic (SVG, Silhouette). This barn card includes several elements, but the assembly is straightforward. Each piece has at least two layers. Start by gluing down the barn stripes, followed by the roof trim. Assemble the door and windows, then attach them to the barn. Center the wreath around the top window and glue the banner to the middle of the barn. Finally, align and attach the small fence along the bottom and right side of the barn.

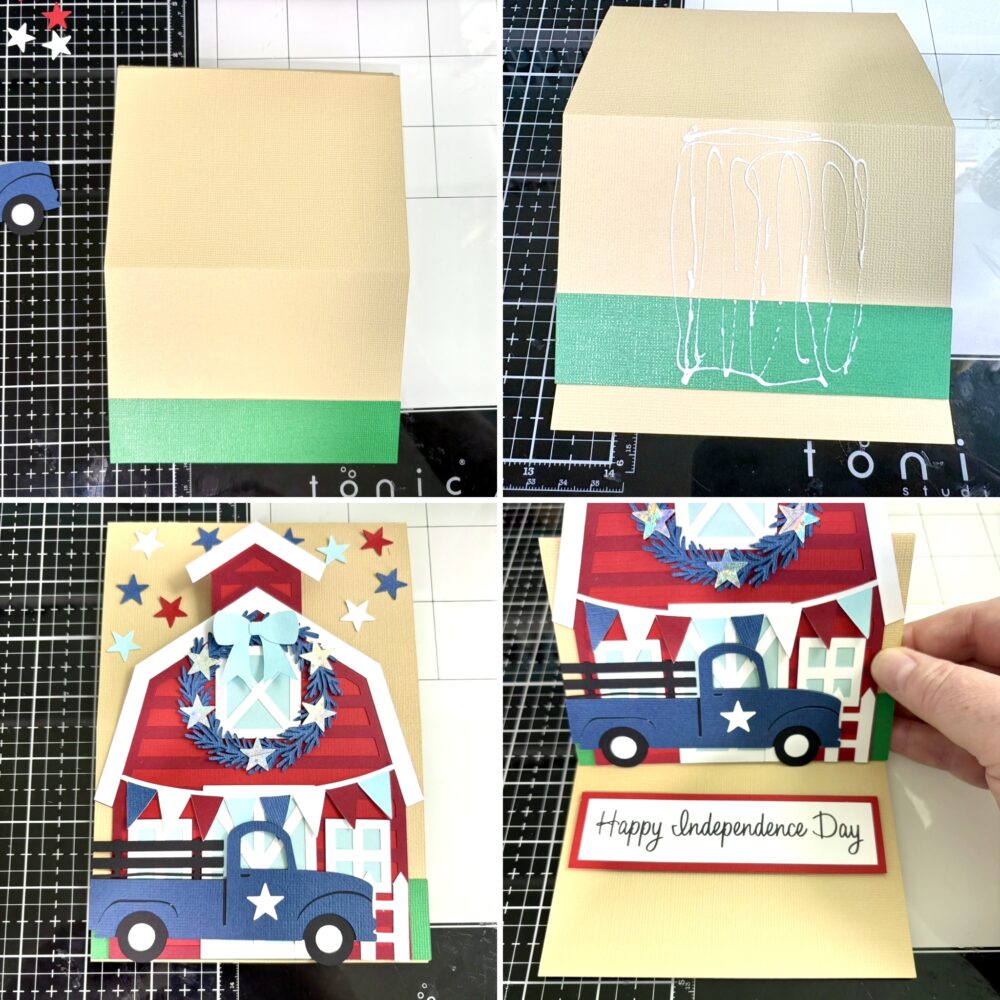
The card base consists of two pieces. The top piece features two score lines that are folded as mountain folds. The end fold is glued to the back piece, forming the card base. Attach the green grass strip to the front of the card at the open edge. Apply glue only up to the middle score line on the card base, then center the barn over the glued area, aligning it with the bottom of the card. The truck can now be glued to the front of the card aligning it to the bottom and left side of the car.
The sentiment is glued inside the card near the center. Adding foam dots to the back of the sentiment will help keep the card open, though they are optional.

This barn card is darling and makes a festive decor piece for the recipient. Be sure to check out all of the available options in Lori’s shop. Thanks for stopping by today!

Brandie

3D Graduation Bouquet Tutorial

Hello, crafty friends! This is Lindsay, sharing a fun graduation project with you today. My oldest daughter graduated this past weekend, and we have been on the grad party circuit as we celebrate with her friends. It’s so fun to see how each party is uniquely decorated. We’ve also handed out a lot of cards and gifts at each stop. This project makes a beautiful centerpiece or card for that special graduate. The file is called “3D Graduation Bouquet,” and it includes the flowers, envelope, and a mini greeting card (svg, silhouette).

After I uploaded the file into Design Space, I decided to change the flowers to blue and yellow. All of the flower centers are white. This fits with the color scheme for the college that my daughter will be attending in the fall.

I began by assembling each layer. I used foam adhesive for extra dimension on the bow, flower centers and grad hat. I also popped up the top green layer for each floral bundle.

Next I shifted my focus to the white folding mechanism. This piece helps the bouquet flatten into an envelope, and it also uses a kickstand to keep the bouquet open and standing–perfect for a centerpiece! I used strong tape to hold the pieces together.   

Moving right along, I folded the piece that extends down from the long white strip. I refer to this piece as the kickstand. You will basically accordion fold the tabs until you have one sturdy piece.

Now it’s time to fold the larger part of the white mechanism and attach it to the blue vase/flower pot base pieces. The kickstand will be even with the bottom of the blue base, but it is not adhered.

Finally, it all comes together! I added adhesive to one set of the blue tabs, connecting the front and back tabs. I also added adhesive to the front of the smaller floral cluster and the back of the larger floral cluster. These get adhered to the front and back of the white X piece, which is now sandwiched between the blue vase.

I hope this inspires you to create a bouquet card or centerpiece today! This file truly has a wow factor when it is assembled! Click on the picture below, and it will take you right to the file on Lori’s site. Thanks for stopping by the blog today! — Lindsay


Rolled Flower Tutorial

Hi friends!
I adore using rolled flowers on layouts and Lori Whitlock has a ton of them to choose from. A lot of people are intimidated by them but they are so easy. Today I’m going to show you just how easy and stunning they are. The two I’m using are Rolled Flower 47 and Rolled Flower 39.
 
Cut your flowers. Mine are cut at about 5 1/2 x 5 1/2. If you want your edges inked, it is easier to do it now but you can do a little inking once the flower is finished also.
 
Remember if you are using 2 sided paper, the color you roll onto will be the color that shows. (the flower below is blue on the back, I want the yellow to show). Pointy tweezers are wonderful to roll these with but they are not necessary. Start rolling the outermost end. I like to roll the flowers tight so they keep their form.
 
Make sure when you roll you are keeping the bottom (the flat, inside edge) even with itself.
Top view of the start of the rolling.
Keep rolling the flower tight. It will look like the below photo.

The reason I like to roll them tight is they hold their form before being glued. Before I add the glue, I like to let them unravel. This is what I mean by they hold their form when rolled right.

Once the flower has unraveled, I add glue to the bottom circle. The best glue I have found to use is actually Glossy Accents.
I add a generous amount to the circle piece in the center of the cut and lay the base of my rolled flower over the glue.
I arrange my rolls until I like the look of it and place a heave punch on top of the flower until it dries.

When my flower had dried I like to rough the petals a little. Sometimes I will crumple the paper before I start to roll the flower to make it easier to distress the petals when the flower has dried.

I posted this layout a while back but it shows just how stunning rolled flowers look on a layout.

Close up of the flowers.


I also used 3D Flower on this layout

Thanks for stopping by and happy crafting!

A Stack of Graduation Cards!

It’s that time of the year to make a stack of Graduation cards!
 
 I chose several files that really give you a lot of bang for your buck! These files include multiple years to use for the future as well! I have made these cards numerous times over the years because they really are so classy looking and are so fast and easy to make! 
 
They are easy to personalize by changing up the colors to reflect your school colors. You can then add school initials or add the grad’s name etc. for a bit of personalization. 
Graduation Shaped Card 2024-2037 (SVGSilhouette)
 
Instructions for a Silhouette: enlarge the file by 200% by choosing the symbol that looks like a slash (highlighted in blue-top row on the left side)  and click 200%. That was pretty easy right? Sorry-I’m not familiar on how  you do that on the Cricut.
 
 
 I always like to add a white center insert to my cards, it’s an especially fun detail if you have a shaped card.
 
For this inside insert I took the 2026 from the file and after selecting the 2026 you can right click and choose release compound path (about 2/3 down the list). From there you can pull the outline away and delete all the little pieces. 
5 x7 Graduation Shaped Card (SVGSilhouette)
After cutting out the Congrats Grad pieces – leave all the letters stuck to the mat. It is easier to grab the center parts of the letters and see where to glue them on your card.
Graduation Card with Pocket (SVGSilhouette)
I just made this next one because it was fast and easy.  I decorated the grad hat like I have seen the grads decorate theirs!
I did add an additional 3×3 black square under the  maroon square of the grad hat. 
I hope you have found some fun Graduation inspiration!
 
🎓🎓🎓Sue Kment 🎓🎓🎓

3D Strawberry Bouquet Tutorial

Hello crafty friends! Noelene here today to share a tutorial of my take of the new 3D Strawberry Bouquet (SVG), (Silhouette). Lori has a few different designs to choose from. They are fun & easy to make!
To start cut out all your pieces. Next I created the small card. Then I valley folded the small piece of the envelope & applied glue to the tabs. I aligned it to the bottom & sides of the larger piece. This creates the pocket.

Next if you want to ink any of your pieces do this before you glue any pieces together. I inked the green stems of the strawberries.

 I wanted some dimension on mine, so I embossed the basket with an embossing folder. Remember to spray a light spray of water on your cardstock before you run it through, so that it makes your cardstock more pliable & not tear. Now glue all your panel pieces. I put some small foam squares on my flowers for dimension. I also put foam squares on the strawberries of the smaller green panel, as this will be on the front.
Now to create the mechanism.
Fold the little tab then fold the mechanism in half & glue the tab down.
For the easel leg glue the single tab to the back, then wrap the rest around going to the back & bringing it to the front glueing each tab. This is to make the easel leg sturdy.
Next valley fold both ends in so that it forms an x.
Now apply glue to the mechanism making sure you do not go past the fold on the easel leg.
Now place the glued mechanism on the inside of one of the pot panels making sure to align the leg to the bottom. It should sit a few millimeters beneath the top. Now, glue the top part of the mechanism only & place the other pot panel on top. Hold down for a minute or so till it dries. Now glue the tabs to the inside. I used paper clips to hold down the tabs until they dried.

Next take the larger foliage panel & turn it over. You want to apply glue on the back of the bottom square part. Now turn it over so you can see your front panels & gently slide it in between the back of your x. The glued square should be stuck onto the back pot panel. Now with the smaller foliage panel you will apply the glue onto the front side of bottom square. This time you will slide it into your x on the front folded part of the mechanism so that the glue adhers to the front pot panel.

Lastly I glued down the bow elements & glued a little flower button to embellish. Lastly I finished off by adding some white gel pen. I didn’t do this before I adhered my pieces, but if you do, it makes it a little easier.
To make your bouquet stand on its own, gently squeeze the sides of the pot & fold in the leg of your mechanism. To fold flat, place it back down again.

I hope you enjoyed my tutorial today! I will be definitely making more of these in the near future.
For more inspiration, check out my Instagram!
Thanks for stopping by!
Hugs
Noelene 🙂