
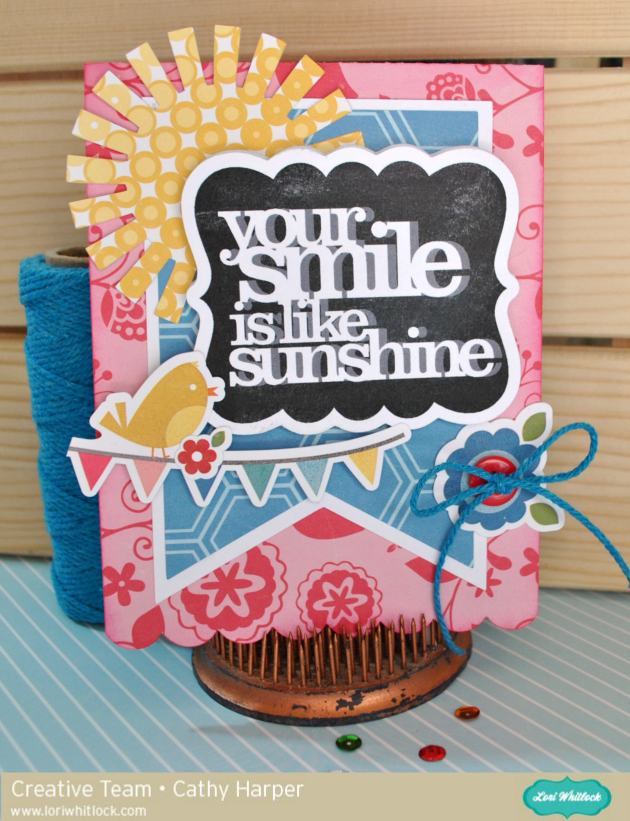
Happy Spring everyone! Cathy here with you today and I have a quick chalkboard tutorial to share with you. The chalkboard look is all the rage in almost everything right now, from home decor to scrapbooking and cardmaking. Lori Whitlock has so many fabulous phrases that are perfect and easy to create that chalkboard look. I created a springy card in no time at all with a few Lori Whitlock files, and the awesome print and cut feature with the Silhouette Cameo!
I used Lori’s Echo Park Fine And Dandy Collection along with some plain smooth white card stock to create my card!
First, I cut my card base using A2 Banner Card.

Next, change your mat setting to 8 1/2 by 11 on your Cameo. This way you have it set for when you need to print! I used the 7 shapes label set and Quote Set 1, using the Your Smile is like Sunshine phrase. I kept my label the same size and sized down the phrase to fit inside.
Now fill in your label with black and your phrase with white. I also, change my cut lines to the colors I am using, just so I can visualize it a bit easier.

Now, make a duplicate of your phrase and pull it off to the side!
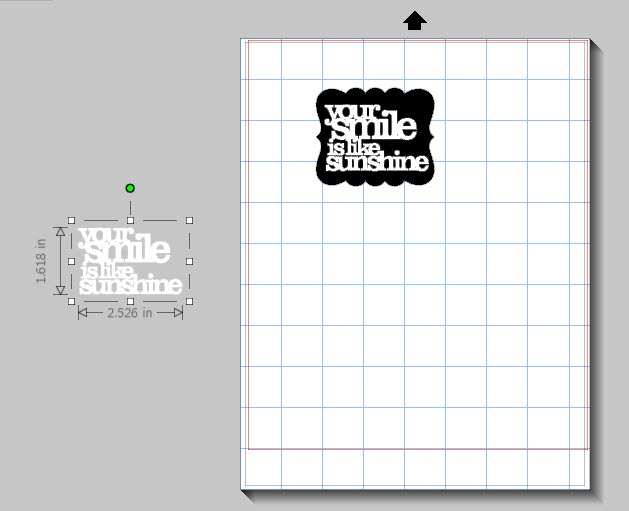
Next, go back to the Fill Color window and scroll down a bit to the Advanced Options…there you will see that you can change the Transparency of an image. I changed mine to about 60%…this gives your image that chalky shadow.

After you change the transparency, simply layer your phrase back over the original, just slightly offsetting it!
(Sorry for the blurry photo, but I wanted you to be able to see how I offset it.) Layering and changing the transparency really gives it that chalkboard look! Now group your image!

I duplicated the image so I had two…just in case! Now add registration marks for the print and cut feature and print your images. Once printed, go back and add the cut lines for the label. I slightly offset mine to match the white border behind my banner! Then send it through your Cameo to cut!

After your images are cut, just for a bit more fun, I just went over it with some real chalk and smudged it with my finger. It really helps pull off that true chalkboard feel!

Really, this takes no time at all once you have figured out the steps and layering. Now just layer and embellish your card. I added a cute sun with some of the patterned paper from the Fine and Dandy Collection using Summer Icons and then a couple of stickers from the Fine and Dandy collection. So cute. I hope you give this technique a try. The possibilities are endless with all the files from Lori’s Shop.

Thank you for sharing your technique, you did a wonderful job! Love it!
Thank you… very cute!
Can you do the same technique with the Cricut Explore? With the chalkboard look?
Fun idea for getting the chalkboard look! Thanks so much for sharing!